Here is a card I made with a variation of Gina K's recessed image technique. I followed the video, but chose not to put pop dots behind the frame for this particular card. This was a fun technique to try, and I encourage you to check it out. The cupcake image is from Inkadinkado's Cupcake Cling Set. The "Hey Cupcake" is from CTV stamp set "Sweet Talk". The cuttlebug folder is one from the "Lace" set. The papers and ribbons were from my stash. I have generic markers. So far the inside is blank. This will go in my "cards in waiting" stack.
A place to share my creations and inspirations with other card makers and scrapers.
Showing posts with label Cuttlebug. Show all posts
2/29/2012
2/24/2012
Welcome to the CTV Challenge#6 "Anything Goes". Mary is awarding two stamp sets of choice to the winner of the challenge. The design team is having a blast with all different types of projects and stamp sets. So, get ready to have fun and in the words of Paulette Jarvey "come play with us."
I chose to make a set of cards as a gift to a friend. I love working with puns, and Mary's Garden Greeting Stamp Set just let the door wide open for me to come up with four cards playing on words. I kept the designs simple yet bright and colorful and kept the embellishments to a minimum so the greetings are the focal points. Since this set of cards is a gift, the insides are left blank for personal messages. Here's a group pic. You can click on any picture for a larger image.
All finished cards measure 5" by 6.5" and are cut from white card stock. Design details are listed with each card image set. Measurements are given down further in the post. Please let me know if you have any questions.
Apple of My Eye:

The apples and basket were cut from the Doodlecharms cartridge. The background paper is red card stock and the green check and apple design paper were from my stash. The "twine" is crochet cotton died with a Sharpie marker.
In a Jam?


The jar is cut from Doodlecharms, the spoon is cut from From My Kitchen, the berries and the two labels are from Preserves. You can not see it in the pictures, but there is a clear transparency sheet as the top layer of the jar. All these papers are from my stash as well as the ribbon.
What a Pear!

The pears are cut from Preserves, the palm tree and the chairs are from Life is a Beach. I used the scalloped-scallop punch from EK Success for the border of the sand. The face stamps are from Peachy Keen and the papers and embellishments are from my stash.
Love in Bloom

The turtles are from Walk in My Garden. I welded them together using my Gypsy. The heart is from Doodlecharms. The ground "border" is from A Child's Year (under icon with shift 8th image I welded three together). Papers and embellishments are from my stash.
Card cuts:
For Apple of My Eye I cut the bushel basket and it's braces and handle at 1.83 " high. I cut the apples and apple blackouts at 1.15" high. I used my Gypsy to hide the apple and highlight on one set so the stems would cut separately. They are small enough that you could just cut them by hand. There are 4 small gold brads that fit into the holes in the braces. I chose to cut one green apple and the rest red just for color interest. I used a white gel pen to color the highlight cuts on the apples and to add some dots to the leaves. The red mat layer is 6.25" by 4.75". The green check layer is 6" by 4.5" and the apple patterned paper is 2.75" by 4.5"
For In a Jam? I cut the fruit jar (from gray card stock) and two of the jar blackouts (one red dot card stock, and one clear transparency) at 4" high. I only used the lid part of the jar of the gray cut out. I used Zip Dry glue to attach the transparency to the red dot card stock. Mary has a similar project with a video here. The strawberries, the additional berry and the leaves were cut from Preserves at 1.52". The jar label is from Preserves, cut #49. I cut a plaid one at 2.11" high and a light green one at 1.89" high. The spoon is from From My Kitchen as is cut at 2.11" high. I cut two of them and glued them together to get more dimension. The plaid background mat is 6.25" by 4.75"
For What a Pear! I cut the very first image on the Preserves cartridge at 2.64". I cut two pears and two centers flipping one of each so the leaves would be on opposite sides. Since there is not a blackout feature on this cartridge, I hid all the details of these images except the outline. The chairs are cut at 2.41" and the palm tree at 4.65" from the Life is a Beach Cartridge. The sky background mat is 6.25" by 4.75" and the sand is 6.25" by 1.75" after the border was cut off.
For Love in Bloom I cut the "ground" border at .85" high, welded three together and welded a 2.5" rectangle from George and Basic Shapes . I wanted a border with flowers, but I didn't have any to fit the need. A simple rectangle with some flower shapes glued behind it would also work. The heart is cut at 1.08" high and the turtles plus the turtle shells are cut at 1.97" high. Rounding to the nearest half inch would also work for anyone who doesn't have a Gypsy. The tulips are buttons I found at Jo Anns. I sponged the blue background for the sky with Ranger Distress Tumbled Glass. The googly eyes are from Michaels and I love the eyelashes. I used larger ones that normal to add humor to the card. The yellow background mat is 6.25" by 4.75", the sky mat is 6" by 4.5" and the ground is 6" by 2.75" (to the top of of the daffodils) after the border was cut off.
People always ask me how I come up with combining many cartridges to get an image. I think having the Gypsy and now the Cricut Craft Room enables you to have access to all the cartridges at once without going through all the booklets individually making browsing easier. The Gypsy search feature or My Cut Search has also helped to find images. However, I spend time to just browsing my cartridges for images that are "hidden" such as on the icon button, or parts of of images. Sometimes, I have my Gypsy with me while I watch TV and I scroll through cartridges during commercials. Another idea, type in a cartridge title (i.e. Cricut Life is a Beach) and the word "cuts" in Google and search for images. You'll be surprised at what other crafters create! Ideas are everywhere you just need time to look. Happy crafting!
Sue

1/31/2012
Cousin Birthday Card
Just a short post today. I'm still not feeling too well, but today is my favorite person's birthday. She's my cousin, but we are more like twin sisters (except she's the pretty one). Anyway, I wanted to do a card that reminds me of her so I picked this beautiful white rose and combined it with some soft and shiny pastels. I got the top part of the sentiment from Bird, this just fantastic blogger! Her creations are just fabulous. Thank you Bird!!! The flower is cut from a sheet out of the DCWV stack "Ciao Bella". There's a couple of stickles and some white organza ribbon from my stash. I used one of the Paper Lace Cuttlebug folders on part of the layering. The other embossing folder is by Sizzix.
Thanks for stopping by. Please leave a comment if you have a chance.
Sue
Thanks for stopping by. Please leave a comment if you have a chance.
Sue
12/16/2011
Cardz TV Design Team Christmas Blog Hop
Welcome to the Cardz TV Design Team Christmas Blog Hop! This is our first blog hop and we are all excited!!!! If you came here from Amanda's blog, you are in the right spot! If you want to start from the beginning, you need to start with our leader Mary's blog. You don't want to miss anyone's blog because there are great cards, and projects and prizes!
My Christmas card is a 5.5" square card that was made with three basics I consider essential in my paper crafting tools.
1. My Merry Christmas stamp is from CardzTV Stamps "Classic Christmas". Not only are these stamps beautiful and easy to use, the sentiments in this collection are a perfect for any variety of Christmas projects. Both traditional and secular sentiments are included in this versatile set. The deep etching of the clear stamps make stamping effortless.
2. My elegant layered mats are cut using Cricut Elegant Edges. I don't have tons of cartridges and I only have the original Cricut that cuts on a 6 by 12 mat, but I would say Elegant Edges should be one of the basic cartridges for your collection. The combinations of designs and the formats of cuts (including borders, ovals, pages, and shapes) make designing projects very easy and there is an endless amount of combinations.
3. I ran the doily cuts through my Cuttlebug using the Swiss Dots folder. This folder is another essential in my collection. Dotted Swiss fabric has always been a classic for me. I like it in my wardrobe, my home decorating and definitely in my paper crafting. It brings a touch of elegance to any paper.
I chose not to chalk around the edges of my mats and frames, but I did ever so lightly highlight the dots with chalk ink.
The supplies and measurements for my card are at the bottom of this post.
Next is Karen's gorgeous project. I know you'll just love it so pop on over. But first...
There are fantastic gifts for participating in our blog hop: Mary, from CardzTV, is giving away a Cricut Gingerbread Seasonal Cartridge AND her CardzTV Holly Jolly Stamp Set. Also, Lynn from bootsandblingtime.blogspot.comhttp://bootsandblingtime.blogspot.com/ is giving away the North Pole Collection paper kit from Crate Paper. In order to register for these fantastic prizes, you must leave a comment on each blog spot along the hop
Here is the order list for the hop:
Theresa - http://www.thescrapbookingqueen.com/
Kristin - http://www.pinkldycrafter.blogspot.com/
Shawnee - http://www.quiverofangels.blogspot.com/
Julie - http://www.cricutchick.com/
Nicole - http://www.teachdanz.blogspot.com/
Sue - http://www.suescraftymess.blogspot.com/ YOU ARE HERE
DeNetra - http://www.craftynanny3.blogspot.com/
Candice - http://www.stampinpearls.blogspot.com/
Card Products and Measurements:
Paper: Recollections White, Color Bok Navy Blue
Paper Wishes Blue snowflake metallic
Ribbon: Hobby Lobby narrow silver zig zag 15"
Ink: Stazon Black for sentiment
Color Chalk light blue (lightly dusted the white doily pieces)
Stamps: Merry Christmas - CARDZ TV Stamp Set Classic Christmas
Gems: Hobby Lobby bulk bag of silver stars
Cricut Cuts: Elegant Edges
Cuts are Eyelet 1 (page 21 in handbook)
Large Doily Shadow navy cut at 5" high
Large Doily white cut at 5" high
Doily Frame Shadow navy cut at 3" high
Doily Frame white cut at 3" high
Sentiment Circle Shadow navy cut at 1.89" (I used George for the circles)
Sentiment Circle white cut at 1.89"
Card base 5.5" x 11" folded at 5.5"
Card top layer (Blue metallic) 5 3/8" square
Thanks for stopping by. Make sure you leave a comment so you are entered for the prizes.
12/03/2011
Christmas Gift Project #2 - Mini Loaf Box
Here's my second paper boxed gift for this year.
I found the tutorial for the mini loaf box here. The entire project is made with one sheet of 8 1/2" by 11" red cardstock and one and one half sheets of green cardstock; I used Recollections papers. I ran the red side panels through the Cuttlebug using the argyle folder. A 1" wide strip of red cardstock topped with a 1/2" strip of green surrounds the contents. I used Mary's CardTV Stamps "Merry Christmas" from the Classic Christmas set for the tag. So, what is the contents of this box you say? I filled it with my Butterscotch Blondies.
Here are some pictures of the box in the making:
and here's the recipe:
Preheat oven to 375 degrees.
Butter and flour a 9 by 13 inch baking dish.
1 1/2 cups firmly packed brown sugar
1 cup unsalted butter
2 1/4 cups all-purpose flour
3/4 teaspoon baking soda
1/2 teaspoon salt
2 eggs (large)
1 teaspoon vanilla
1 1/3 cups butterscotch chips
Put the sugar in a large bowl. Melt the butter in a microwave safe bowl. Stir the butter into the brown sugar until a smooth batter forms. Cool to room temp. In a separate bowl, combine the flour, baking soda, and salt. To the sugar/butter mixture, add eggs and vanilla. Slowly add the flour mixture while beating until the batter is smooth. Fold in the butterscotch chips. Place batter into the prepared pan and bake for 20-25 minutes or until a toothpick comes out clean. Cool, cut into squares.
Thanks for stopping by. If you get a chance, please leave a comment.
Happy Holidays
Sue
11/28/2011
Christmas Gift Project #1 - Tissue Box Cover
This is the first gift project I made for this Christmas. I found a terrific tutorial on a tissue box cover here. Thank you Diane Zechman and Splitcoaststampers! I had a lot of fun making the "faux leather" look and it really went together pretty fast. Of course I didn't have a box of tissues when I went to photograph the project :(, but I think you'll get the idea. The entire project is made from craft paper and inked with Vintage Photo by Ranger. Here's a couple pics of the top. I used Elegant edges to cut the center top piece and the small strips around the top of the sides. They were from the "Eyelet-2 Cut".
The larger square on the top, as well as the squares on the box sides are embossed with the Cuttlebug using a folder called "Paper Lace" (I don't know the exact name because it came in a set of 4 folders and they aren't labeled individually).
Views of the sides. I apologize for the poor details on the embellishments by K & Company. There was glare from the sunshine I couldn't block out. They are three dimensional vintage and I thought they went well with the rustic look of the cover.
Close up detail of the embossing and edges along the top.
I kept the embellishments simple so they would overpower the embossing or interfere with the box's purpose. I glued red gingham ribbon around the edge of the box top (which doesn't come off - you load the tissue from the bottom). I tied a bow for the top with a couple of teddies.
I have a few more "gift" ideas I'm working on and will post them as I finish each one. Thanks for stopping by.
Sue.
11/08/2011
Card-In-Waiting 2
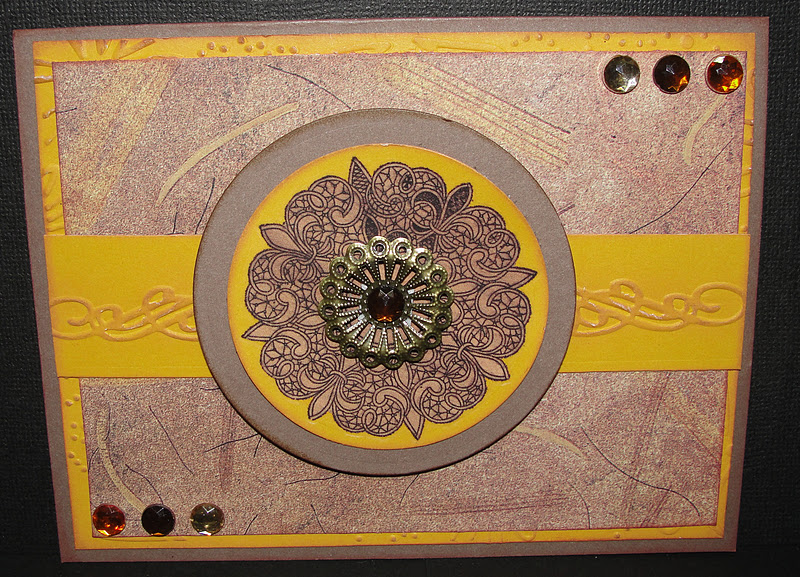
Another "card-in-waiting" today. I seem to always need a card for a guy, but never enough time to come up with ideas. This card was an offshoot of my efforts to organize my Cuttlebug folders. I was making examples of each folder for a binder and I thought combine these two folders Sue. So I did.
It's a very simple card to make.
I used only two colors of card stock (craft and a yellow from Color Bok). Standard mat sizes: the yellow background (4" x 5.25") I ran through the Cuttlebug folder "Snowflakes" then inked with Ranger vintage photo ink. The patterned paper (3.75" x 5") is a scrap from my stash. The yellow center strip (1"x 5.25") is embossed with the Cuttlebug border set "With Love", and inked the same way as the background paper. HINT: emboss the image first then cut the strip. The circles (2.5" and 2") were cut using the Cricut with the George cart and inked. Now the fun part. The image is a rub-on from a set of vintage images sold at Michaels (they were by the unfinished wood shapes). I used a large metal medallion brad with a jewel center and small gems to finish off the card.
There are no sentiments on the card yet. I'm creating a stash of cards for "emergency" situations when I don't have time to create a needed card. This is going in the masculine section of the stash.
Thanks for stopping by.
Sue
10/06/2011
Thanksgiving Card- Cuttlebug Cuts
I used some interesting supplies for this Thanksgiving card:
Most of the leaves were cut using paint sample cards. I used the Cuttlebug 2-Inch-by-2-Inch Dies (Set of 4), Fall Leaves to cut the leaves. The veins were made by hand with a stylus.
I used the Tsukineko's Sheer Shimmer Frost on the card front. These pictures were taken outside this morning and the frost really shines!
I removed the center from a 4" white doily and then stained it with Memento inks (dandelion, canteloupe and tangelo) and edged everything with TH Distress Ink (antique photo). The card stock was from DCWV assorted packs, the gems are Recollections, and last but not least the stamp is Stampendous. Here's the inside of the card.
I'm entering this at the CCR challenge "The Challenge: Create A new project with the theme Thank you, Thanksgiving or a Turkey!"
Thanks for stopping by. Leave a comment if you have time.
Sue
3/23/2011
Three Elements Page Sketch - Variation 2
Here's the original sketch again SKETCH
Here's my second variation, still pretty close to the original.
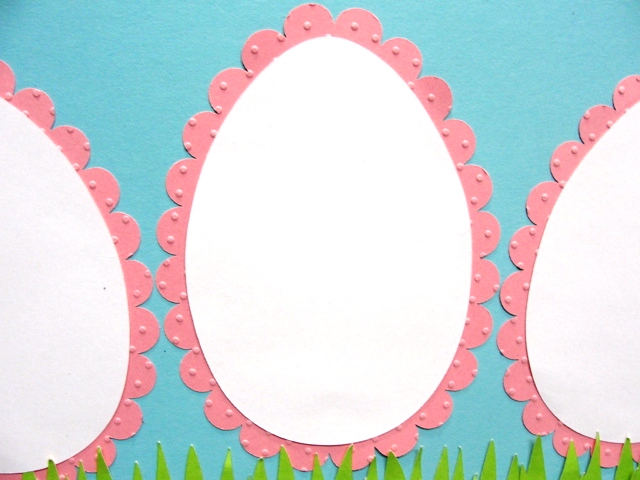
This is another Easter sketch for my three grandchildren. I used the same background paper as the previouse page. I switched out the square frames with egg shaped ones. I used Easter 2010 to cut both the scalloped and plain eggs. I ran the scalloped eggs through the Swiss Dots folder and my Cuttlebug. I used the Easter 2010 cartridge to also cut the three rabbits. I only cut the blackout of each. Two are chocolate brown and one is vanilla (Recollections card stock). My middle grandchild doesn't like chocolate. (She can't be mine??? LOL) The bows are from Walmart. The basket is from Doodlecharms. I didn't use the handle because I couldn't get the frames to look right. I cut it out of plain yellow card stock (Bazzill). I used my EK Success braid punch to add dimension to the top of the basket. I used my MS score board and made a basket weave pattern. I then used brown chalk to highlight the score lines. Glue dotted some silk daisies and ribbon flowers to make it more festive. The grass is cut from Platin Schoolbook. I welded four of the grass cuts together and made them 11.5 inches long. I then cut two of them and layered them behind the basket and in front of the eggs. The double zigzag is also from Plantin Schoolbook. I used the same technique only I cut the pink one taller than the white. Then adhered them together for the border.
If someone wants them, I will post the gypsy screen shots here for the cuts. The lettering for the 3 Good Eggs title is from my stash.
Thanks for stopping by. Let me know if you have any questions.
2/28/2011
Cricut Card Monday #6
Potted Sunflowers - This version of the Cricut Card cuts was a basic A2 card cut from page 28 of A Child Year. I used actual size and my Gypsy to cut the base of the card at 4.25" by 11".
The card stock and papers are from the 6" 12" stacks of Cricut paper. I used a MS Border punch to accent the green center panel. The flower pot, sunflowers, and garden tools are cut from A Walk In My Garden cartridge. I used the Cuttlebug to distress the pot and "gripper dots" to the handles of the garden tools.
Here are closeups and details:
Here is the inside of the card:
Thanks for stopping by to take a peek.
Sue
All Occasion Cards
I'm trying to get into Spring being three weeks away! At least according to the calendar. I found some absolutely beautiful iris, hydrangea, and lilac flowers by K & Company at JoAnns. This is what they inspired:
The Butterfly Card:
Aqua and lavender card stock ran through a Sizzix folder. The aqua is debossed and the lavender embossed. I used an EK Success border punch for both the border and the cutouts for the corners. The butterfly and flowers are from the K & Company flower dimensional package.
A closeup of the details and the inside of this card:
I used the aqua and plain white card stock for the inside of the card. Just one flower highlights the corner.
The Dragonfly Card:
A pale and a dark lavender along with white card stock, I used the EK Success Braid Border punch on both card stocks to add some interest to the bottom of the card. Both the dragon fly and the hydrangeas are from the K & Company dimensional package. Some white crochet cotton is wrapped around the center dark lavender strip, and a few gold gems to add some sparkle.
A closeup of the details and the inside of this card:
I chose not to add greetings at this point since they are suitable for many occasions.
Subscribe to:
Posts (Atom)