12/03/2011

Christmas Gift Project #2 - Mini Loaf Box

Here's my second paper boxed gift for this year.


I found the tutorial for the mini loaf box here.  The entire project is made with one sheet of 8 1/2" by 11"  red cardstock and one and one half sheets of green cardstock; I used Recollections papers.  I ran the red side panels through the Cuttlebug using the argyle folder.  A 1" wide strip of red cardstock topped with a 1/2" strip of green surrounds the contents.  I used Mary's CardTV Stamps "Merry Christmas" from the Classic Christmas set for the tag.  So, what is the contents of this box you say?  I  filled it with my Butterscotch Blondies.
Here are some pictures of the box in the making:


and here's the recipe:
Preheat oven to 375 degrees.
Butter and flour a 9 by 13 inch baking dish.

1 1/2 cups firmly packed brown sugar
1 cup unsalted butter
2 1/4 cups all-purpose flour
3/4 teaspoon baking soda
1/2 teaspoon salt
2 eggs (large)
1 teaspoon vanilla
1 1/3 cups butterscotch chips

Put the sugar in a large bowl.  Melt the butter in a microwave safe bowl.   Stir the butter into the brown sugar until a smooth batter forms.  Cool to room temp.  In a separate bowl, combine the flour, baking soda, and salt.  To the sugar/butter mixture, add eggs and vanilla.  Slowly add the flour mixture while beating until the batter is smooth.  Fold in the butterscotch chips.  Place batter into the prepared pan and bake for 20-25 minutes or until a toothpick comes out clean.  Cool, cut into squares.
Thanks for stopping by.  If you get a chance, please leave a comment.
Happy Holidays
Sue

11/28/2011

Christmas Gift Project #1 - Tissue Box Cover

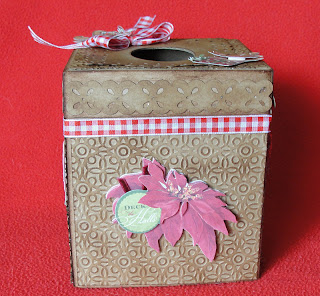
This is the first gift project I made for this Christmas.  I found a terrific tutorial on a tissue box cover here.  Thank you Diane Zechman and Splitcoaststampers!  I had a lot of fun making the "faux leather" look and it really went together pretty fast.  Of course I didn't have a box of tissues when I went to photograph the project    :(,  but I think you'll get the idea. The entire project is made from craft paper and inked with Vintage Photo by Ranger.  Here's a couple pics of the top.  I used Elegant edges to cut the center top piece and the small strips around the top of the sides.  They were from the "Eyelet-2 Cut".
The larger square on the top, as well as the squares on the box sides are embossed with the Cuttlebug using a folder called "Paper Lace" (I don't know the exact name because it came in a set of 4 folders and they aren't labeled individually).
 Views of the sides.  I apologize for the poor details on the embellishments by K & Company.  There was glare from the sunshine I couldn't block out.  They are three dimensional vintage and I thought they went well with the rustic look of the cover.


 Close up detail of the embossing and edges along the top.
I kept the embellishments simple so they would overpower the embossing or interfere with the box's purpose.  I glued red gingham ribbon around the edge of the box top (which doesn't come off - you load the tissue from the bottom).  I tied a bow for the top with a couple of teddies.  
I have a few more "gift" ideas I'm working on and will post them as I finish each one.  Thanks for stopping by.
Sue.