
12/24/2011
Merry Christmas 2011
Just wanted to wish everyone a wonderful and safe Christmas. My wish for you is that each and everyone has a peaceful, safe, jolly, family-oriented, loving, carefree holiday day! Take which ever part of the wish you want and I hope it will come true! Blessings to all. Sue

12/16/2011
Cardz TV Design Team Christmas Blog Hop
Welcome to the Cardz TV Design Team Christmas Blog Hop! This is our first blog hop and we are all excited!!!! If you came here from Amanda's blog, you are in the right spot! If you want to start from the beginning, you need to start with our leader Mary's blog. You don't want to miss anyone's blog because there are great cards, and projects and prizes!
My Christmas card is a 5.5" square card that was made with three basics I consider essential in my paper crafting tools.

1. My Merry Christmas stamp is from CardzTV Stamps "Classic Christmas". Not only are these stamps beautiful and easy to use, the sentiments in this collection are a perfect for any variety of Christmas projects. Both traditional and secular sentiments are included in this versatile set. The deep etching of the clear stamps make stamping effortless.
2. My elegant layered mats are cut using Cricut Elegant Edges. I don't have tons of cartridges and I only have the original Cricut that cuts on a 6 by 12 mat, but I would say Elegant Edges should be one of the basic cartridges for your collection. The combinations of designs and the formats of cuts (including borders, ovals, pages, and shapes) make designing projects very easy and there is an endless amount of combinations.
3. I ran the doily cuts through my Cuttlebug using the Swiss Dots folder. This folder is another essential in my collection. Dotted Swiss fabric has always been a classic for me. I like it in my wardrobe, my home decorating and definitely in my paper crafting. It brings a touch of elegance to any paper.
 I chose not to chalk around the edges of my mats and frames, but I did ever so lightly highlight the dots with chalk ink.

My Christmas card is a 5.5" square card that was made with three basics I consider essential in my paper crafting tools.

1. My Merry Christmas stamp is from CardzTV Stamps "Classic Christmas". Not only are these stamps beautiful and easy to use, the sentiments in this collection are a perfect for any variety of Christmas projects. Both traditional and secular sentiments are included in this versatile set. The deep etching of the clear stamps make stamping effortless.
2. My elegant layered mats are cut using Cricut Elegant Edges. I don't have tons of cartridges and I only have the original Cricut that cuts on a 6 by 12 mat, but I would say Elegant Edges should be one of the basic cartridges for your collection. The combinations of designs and the formats of cuts (including borders, ovals, pages, and shapes) make designing projects very easy and there is an endless amount of combinations.
3. I ran the doily cuts through my Cuttlebug using the Swiss Dots folder. This folder is another essential in my collection. Dotted Swiss fabric has always been a classic for me. I like it in my wardrobe, my home decorating and definitely in my paper crafting. It brings a touch of elegance to any paper.


The supplies and measurements for my card are at the bottom of this post.
Next is Karen's gorgeous project. I know you'll just love it so pop on over. But first...
There are fantastic gifts for participating in our blog hop: Mary, from CardzTV, is giving away a Cricut Gingerbread Seasonal Cartridge AND her CardzTV Holly Jolly Stamp Set. Also, Lynn from bootsandblingtime.blogspot.comhttp://bootsandblingtime.blogspot.com/ is giving away the North Pole Collection paper kit from Crate Paper. In order to register for these fantastic prizes, you must leave a comment on each blog spot along the hop
Here is the order list for the hop:
Theresa - http://www.thescrapbookingqueen.com/
Kristin - http://www.pinkldycrafter.blogspot.com/
Shawnee - http://www.quiverofangels.blogspot.com/
Julie - http://www.cricutchick.com/
Nicole - http://www.teachdanz.blogspot.com/
Sue - http://www.suescraftymess.blogspot.com/ YOU ARE HERE
DeNetra - http://www.craftynanny3.blogspot.com/
Candice - http://www.stampinpearls.blogspot.com/
Card Products and Measurements:
Paper: Recollections White, Color Bok Navy Blue
Paper Wishes Blue snowflake metallic
Ribbon: Hobby Lobby narrow silver zig zag 15"
Ink: Stazon Black for sentiment
Color Chalk light blue (lightly dusted the white doily pieces)
Stamps: Merry Christmas - CARDZ TV Stamp Set Classic Christmas
Gems: Hobby Lobby bulk bag of silver stars
Cricut Cuts: Elegant Edges
Cuts are Eyelet 1 (page 21 in handbook)
Large Doily Shadow navy cut at 5" high
Large Doily white cut at 5" high
Doily Frame Shadow navy cut at 3" high
Doily Frame white cut at 3" high
Sentiment Circle Shadow navy cut at 1.89" (I used George for the circles)
Sentiment Circle white cut at 1.89"
Card base 5.5" x 11" folded at 5.5"
Card top layer (Blue metallic) 5 3/8" square
Thanks for stopping by. Make sure you leave a comment so you are entered for the prizes.
12/15/2011
Hot Chocolate Mix
Just thought I'd share this Hot Chocolate Mix recipe. I've been making it since 1982 when Pillsbury published a small Classic Cookbook (#19) called Children's Choice Cookbook.
Ingredients:
25.6 oz package (8 quarts) instant nonfat dry milk
1 lb container instant cocoa mix (I use Nestle' Quick dry mix)
6 oz. jar nondairy powdered creamer
1 cup powdered sugar
1/4 teaspoon salt
In a large container, combine all ingredients. Store tightly covered. For each serving, combine 1/4 cup of the mix with 1 cup of boiling water. Stir until dissolved. Makes about 50 cups of cocoa.
The cocoa is in the center of the picture and the cookies are directly below Raggedy Anne's apron.
 My favorite cookie to go with:
Applesauce Gingies (from same book)
1 pkg. Pillsbury Gingerbread Mix
1 cup applesauce
1/12 cups rolled oats
3/4 cup raisins
Frosting
2 cups powdered sugar
2 tablespoons softened butter or margarine
2-3 tablespoons milk
1/2 teaspoon vanilla
dash of salt
raisins
Heat oven to 400 degrees. Grease cookie sheets (or line with parchment paper). In large bowl combine all cookie ingredients; mix well. Drop dough by rounded teaspoonfuls, 2 inches apart, on prepared cookie sheets. Bake at 400 degrees F for 10 to 12 minutes. Cool.
In a small bowl, combine all frosting ingredients; beat until smooth and creamy. Spread over cooled cookies. Deconrate with raisins. Store in tightly covered container. 60 cookies.
Ingredients:
25.6 oz package (8 quarts) instant nonfat dry milk
1 lb container instant cocoa mix (I use Nestle' Quick dry mix)
6 oz. jar nondairy powdered creamer
1 cup powdered sugar
1/4 teaspoon salt
In a large container, combine all ingredients. Store tightly covered. For each serving, combine 1/4 cup of the mix with 1 cup of boiling water. Stir until dissolved. Makes about 50 cups of cocoa.
The cocoa is in the center of the picture and the cookies are directly below Raggedy Anne's apron.

Applesauce Gingies (from same book)
1 pkg. Pillsbury Gingerbread Mix
1 cup applesauce
1/12 cups rolled oats
3/4 cup raisins
Frosting
2 cups powdered sugar
2 tablespoons softened butter or margarine
2-3 tablespoons milk
1/2 teaspoon vanilla
dash of salt
raisins
Heat oven to 400 degrees. Grease cookie sheets (or line with parchment paper). In large bowl combine all cookie ingredients; mix well. Drop dough by rounded teaspoonfuls, 2 inches apart, on prepared cookie sheets. Bake at 400 degrees F for 10 to 12 minutes. Cool.
In a small bowl, combine all frosting ingredients; beat until smooth and creamy. Spread over cooled cookies. Deconrate with raisins. Store in tightly covered container. 60 cookies.
12/09/2011
Cardz TV Stamp Challenge #2 Crafty Christmas
Welcome to Cardz TV Stamp Challenge #2 CRAFTY CHRISTMAS! Please join in the fun and look for a surprise! Mary will be giving away not one but TWO sets of stamps to the winner of the challenge.
Here's my project - a 5 1/2" by 5 1/2" square card.

Now about the card:
Inspired by Cardmaking and Papercraft magazine, I made this card using "Classic Christmas" stamp "Noel". Here's a close up of the beautiful Noel stamp. This is an elegant stamp set with deep swirls!
 And here is a closeup of the polar bears. This image is from the Winter Wonder Christmas Stamp Collection that came with issue 11 of Cardmaking and Papercraft . I stamped and colored the image twice, then cut out the polar bears and layered them for depth. The oval grouping is popped up from the squares below to add more depth to the card.


Here's my project - a 5 1/2" by 5 1/2" square card.

Now about the card:
Inspired by Cardmaking and Papercraft magazine, I made this card using "Classic Christmas" stamp "Noel". Here's a close up of the beautiful Noel stamp. This is an elegant stamp set with deep swirls!


The solid papers are from Recollections and Christmas paper is from Me and My Big Ideas. The ovals and the squares were cut from the George cartridge.


Make sure you check out all the other DT members at the CardzTV Stamp Challenge and let us see how you're having a Crafty Christmas! Thanks for stopping by; I'd love to hear what you think about the card, challenge, stamps or to answer any questions. Just leave a comment.
Sue
12/03/2011
Christmas Gift Project #2 - Mini Loaf Box
Here's my second paper boxed gift for this year.

I found the tutorial for the mini loaf box here. The entire project is made with one sheet of 8 1/2" by 11" red cardstock and one and one half sheets of green cardstock; I used Recollections papers. I ran the red side panels through the Cuttlebug using the argyle folder. A 1" wide strip of red cardstock topped with a 1/2" strip of green surrounds the contents. I used Mary's CardTV Stamps "Merry Christmas" from the Classic Christmas set for the tag. So, what is the contents of this box you say? I filled it with my Butterscotch Blondies.


I found the tutorial for the mini loaf box here. The entire project is made with one sheet of 8 1/2" by 11" red cardstock and one and one half sheets of green cardstock; I used Recollections papers. I ran the red side panels through the Cuttlebug using the argyle folder. A 1" wide strip of red cardstock topped with a 1/2" strip of green surrounds the contents. I used Mary's CardTV Stamps "Merry Christmas" from the Classic Christmas set for the tag. So, what is the contents of this box you say? I filled it with my Butterscotch Blondies.

Here are some pictures of the box in the making:


and here's the recipe:
Preheat oven to 375 degrees.
Butter and flour a 9 by 13 inch baking dish.
1 1/2 cups firmly packed brown sugar
1 cup unsalted butter
2 1/4 cups all-purpose flour
3/4 teaspoon baking soda
1/2 teaspoon salt
2 eggs (large)
1 teaspoon vanilla
1 1/3 cups butterscotch chips
Put the sugar in a large bowl. Melt the butter in a microwave safe bowl. Stir the butter into the brown sugar until a smooth batter forms. Cool to room temp. In a separate bowl, combine the flour, baking soda, and salt. To the sugar/butter mixture, add eggs and vanilla. Slowly add the flour mixture while beating until the batter is smooth. Fold in the butterscotch chips. Place batter into the prepared pan and bake for 20-25 minutes or until a toothpick comes out clean. Cool, cut into squares.
Thanks for stopping by. If you get a chance, please leave a comment.
Happy Holidays
Sue
11/28/2011
Christmas Gift Project #1 - Tissue Box Cover
This is the first gift project I made for this Christmas. I found a terrific tutorial on a tissue box cover here. Thank you Diane Zechman and Splitcoaststampers! I had a lot of fun making the "faux leather" look and it really went together pretty fast. Of course I didn't have a box of tissues when I went to photograph the project :(, but I think you'll get the idea. The entire project is made from craft paper and inked with Vintage Photo by Ranger. Here's a couple pics of the top. I used Elegant edges to cut the center top piece and the small strips around the top of the sides. They were from the "Eyelet-2 Cut".
 The larger square on the top, as well as the squares on the box sides are embossed with the Cuttlebug using a folder called "Paper Lace" (I don't know the exact name because it came in a set of 4 folders and they aren't labeled individually).
 Views of the sides. I apologize for the poor details on the embellishments by K & Company. There was glare from the sunshine I couldn't block out. They are three dimensional vintage and I thought they went well with the rustic look of the cover.


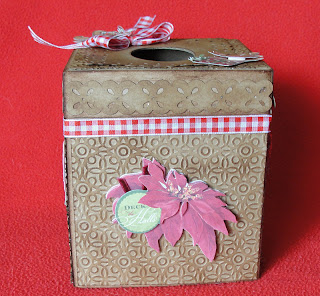
 Close up detail of the embossing and edges along the top.
 I kept the embellishments simple so they would overpower the embossing or interfere with the box's purpose. I glued red gingham ribbon around the edge of the box top (which doesn't come off - you load the tissue from the bottom). I tied a bow for the top with a couple of teddies.
I have a few more "gift" ideas I'm working on and will post them as I finish each one. Thanks for stopping by.
Sue.


I have a few more "gift" ideas I'm working on and will post them as I finish each one. Thanks for stopping by.
Sue.
11/20/2011
Cricut Cardz Challenge 95
FOR CARDZ TV CHALLENGE #1 CLICK HERE.
"We're So Thankful"! is challenge #95 at Cricut Cardz Challenge. Make a Thanksgiving card using a card cut from any Cricut Cartridge.
Here's my entry:
 The card cut is from Picturesque. The cartridge shows it as a tri-fold card, but I changed it to a bi-fold. It is cut at 4.25" high (making it 11.18" wide). This is my favorite cartridge for card cuts because they are all unique.

The greeting is cut from Lyrical Letters at 1.65" high making it 4" wide. I cut the pinecone twice splitting the second cut into the cone and the needles. I inked the needles green and the cone brown on that cut. Then layered both pieces onto the first cut before adding it to the phrase cut.
 I wanted my little surprise to really stand out so I backed the windows with green glitter paper and recut only one window (by hand).
Here is the inside:
 I just love this little pilgrim mouse. He is so sweet. The beautiful saying "Sending you miles of smiles" is from CardzTV Stamps. It is part of the Encouraging Thoughts set Mary created. I must say these are some of the best quality stamps I've ever used. They are really deep cut so they ink beautifully.

Supplies
Stamps: CardzTV Stamps "Encouragimg Thoughts"
Ink: Momento Rich Cocoa, Olive Green
Paper: Recollections white and craft, DCWV green glitter, Dana's Closet green (inside lining on top)
Bling: Recollections flower and gem
Cuts: Cricut Picturesque and Lyrical Letters
Image: MS Office
Thanks for stopping by. Be sure to check out all the other entries at Cricut Cardz Challenge.
Sue
"We're So Thankful"! is challenge #95 at Cricut Cardz Challenge. Make a Thanksgiving card using a card cut from any Cricut Cartridge.
Here's my entry:


The greeting is cut from Lyrical Letters at 1.65" high making it 4" wide. I cut the pinecone twice splitting the second cut into the cone and the needles. I inked the needles green and the cone brown on that cut. Then layered both pieces onto the first cut before adding it to the phrase cut.

Here is the inside:


Supplies
Stamps: CardzTV Stamps "Encouragimg Thoughts"
Ink: Momento Rich Cocoa, Olive Green
Paper: Recollections white and craft, DCWV green glitter, Dana's Closet green (inside lining on top)
Bling: Recollections flower and gem
Cuts: Cricut Picturesque and Lyrical Letters
Image: MS Office
Thanks for stopping by. Be sure to check out all the other entries at Cricut Cardz Challenge.
Sue
11/18/2011
Cardz TV Stamp Challenge #1
Today's an exciting day! Mary is having the first CardzTV Stamp Challenge here. We were asked to make a card "In Our Style". I'm featuring Mary's stamp set called "Classic Christmas" which is a beautiful set of wonderful sentiments in scripted letters and lots of swirls!
My style is:
More than anything about card making, I love to change smooth and flat paper into a card with texture and dimension. I usually try to stay in three colors and I like to add bling! So here's my entry, a Christmas easel card featuring a snowflake cut from When It's Cold Outside.

 Products Used:
Stamps: CardzTV Stamps "Classic Christmas"

Ink: StazOn Black
Paper: Recollections White, Black
Embossing: Versamark Stamp Pad, Gold Ultra Fine Embossing Powder
Bling: Recollections ruby gems, HOTP Dazzles (Stacking Hearts)
Cricut Cartridge: When It's Cold Outside cut at 5.25" both main cut and shadow 3rd row 2nd image
 Thanks for stopping by. Be sure to stop by the first CardzTV Stamp Challenge here to check out all the other projects. I promise you will be glad you did!
Sue
My style is:
More than anything about card making, I love to change smooth and flat paper into a card with texture and dimension. I usually try to stay in three colors and I like to add bling! So here's my entry, a Christmas easel card featuring a snowflake cut from When It's Cold Outside.

Here's the side view.

Stamps: CardzTV Stamps "Classic Christmas"

Ink: StazOn Black
Paper: Recollections White, Black
Embossing: Versamark Stamp Pad, Gold Ultra Fine Embossing Powder
Bling: Recollections ruby gems, HOTP Dazzles (Stacking Hearts)
Cricut Cartridge: When It's Cold Outside cut at 5.25" both main cut and shadow 3rd row 2nd image

Sue
11/14/2011
Christmas Tag Card
I watched this Paper Wishes Webisode on making a small mini from die cut labels. I didn't really want to make a mini, but decided to make a card using the same idea. I have a friend who loves the images of Christmas so much she displays them throughout her house all year long. I thought she would get a kick out of this card. It is so easy to make. I still have to cover the front of the card, and now that my stamps have arrived I can get to that part. But in the meantime I wanted to share the inside.
You start with 6 1/8" by 12" piece of card, I used Recollections White Card. You score along the 12" side at 4" and 8". Between the 4 and 8 inch score lines you score every 1/2 inch.


These 1/2" scores are folded mountain/valley then are glued to form four tabs. These tabs become the spines for the pages.

I didn't add too many layers to the pages, so the card would be flat. Most of the elements were stickers and rub ons I had in my stash from last Christmas sales. I only inked all over the first page. I thought I would like it, but it seemed a bit over powering when I got done. Much of the bling is from Dazzles gems since they are flat but the holographic images are beautiful.
So here are the pages I made:
Page 1.


Thanks for stopping by. Leave a comment if you have the time.
Sue
Subscribe to:
Posts (Atom)