Wanted to wish everyone a Happy New Year and I hope this year brings good health and happiness to each of you.
I want to thank Mary at CardzTV for featuring a card I made. Mary was sweet and featured it on a Cards and Coffee this week. She is such a wonderful, talented friend. If you would like to see the details of the card click here Mary's Birthday Card.
I haven't been making any paper crafts with everyone home - it's such a mad house. But they are all going back to school on Monday. I was lucky enough to get Life is a Beach, Winter Wonderland, Robotz, and 50 States (I love birds and flowers, and now I have 50 new ones of each.) Can't wait to use them.
In the mean time, I'm busy thinking up ideas. I think on Mondays, I will create a card made using a card feature on one of the Cricut cartridges. Gee, there are so many of them throughout all the cartridges.
So I hope everyone enjoys this evening and a this weekend. Be safe!
Sue
12/31/2010
12/24/2010
Merry Christmas to All and to All a Good Night!!
I wish you all a Happy Holiday Season. May peace and love surround you and joy and comfort abound.
 Sue
Sue

12/19/2010
Hot Cocoa, Candy Boxes and Cakes
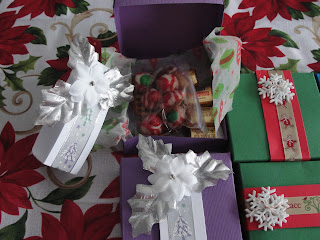
Good afternoon everyone. I'm sorry I haven't posted in so long. I've been working day and night on catch up projects. I completed gift containers for the boy scouts, the girl scouts, teachers, bus drivers, co-workers, my grand children's bff, and other friends and relatives. All together I made 30 hot cocoa cards, based on Mary's post here , and 40 of the candy gift boxes based on Mary's post here.
Here are some of the candy gift boxes I made.


The peppermint pretzel recipe is here.
My DIL and I made 30 dozen cookies and a ton of fudge. to fill trays we give away. I made the best two cakes. They are both bundt cakes. They looked very pretty for the middle of cookie trays.
One is a Candy Cane Cake
 Here's the recipe
The Second is Butter-Rum Pound Cake
 Here's the recipe
I don't own a camera, so I've been using my DILs. However, she is on vacation with my grandchildren for the next week. So I won't be able to post any pictures. I still have a few Christmas cards to get in the mail and I haven't wrapped anything yet. Is anyone else swamped? It didn't help that we got dumped with a blizzard last weekend. It took until Tuesday to get dug out. I can't bake with a bunch of people in the house, so I baked all day Tuesday when the kids got to go back to school and my son and DIL got to go to work. Whew.
Well, I spent today designing a few last Christmas cards. I just need to cut them out and assemble. Then I think the cards are finished. Yeah!!!
Thanks for stopping by.
Sue
Here are some of the candy gift boxes I made.


The peppermint pretzel recipe is here.
My DIL and I made 30 dozen cookies and a ton of fudge. to fill trays we give away. I made the best two cakes. They are both bundt cakes. They looked very pretty for the middle of cookie trays.
One is a Candy Cane Cake
The Second is Butter-Rum Pound Cake
I don't own a camera, so I've been using my DILs. However, she is on vacation with my grandchildren for the next week. So I won't be able to post any pictures. I still have a few Christmas cards to get in the mail and I haven't wrapped anything yet. Is anyone else swamped? It didn't help that we got dumped with a blizzard last weekend. It took until Tuesday to get dug out. I can't bake with a bunch of people in the house, so I baked all day Tuesday when the kids got to go back to school and my son and DIL got to go to work. Whew.
Well, I spent today designing a few last Christmas cards. I just need to cut them out and assemble. Then I think the cards are finished. Yeah!!!
Thanks for stopping by.
Sue
12/11/2010
Charlene's Great Soup
Please stop by and visit Charlene at Paper and Ink Playground she has this wonderful soup recipe that will warm you up:
 And this gorgeous Christmas card:
 Charlene is a great artist. I've been following her work for a long time and she is very talented. I promise you won't be disappointed if you check out her blog. She is also giving a chance to win beautiful blog candy. See the left side bar for a picture of it.
Have a great day.
Sue


Have a great day.
Sue
Chistmas Ornaments from Christmas Solutions
Just a brief post to show a couple wall decor ornaments I made from the Christmas Solutions Cartridge. They are cut at the maximum size I can get on an Original Cricut.
The tree is cut at 8.35 inches (turned at 90 degrees on my Gypsy). There are three layers, dark green shimmer, white and lighter green.
 The wreath is cut at 5.5 inches. There are three layers dark green, green shimmer and green shimmer leaves.
 I used gems and peals and a white gel pen to "gussy them up".
Thanks for stopping by.
Sue
The tree is cut at 8.35 inches (turned at 90 degrees on my Gypsy). There are three layers, dark green shimmer, white and lighter green.


Thanks for stopping by.
Sue
12/10/2010
Holiday Candy Snowman Hats
If you have never visited Scraphappy, I suggest you do. Julie Moss is so talented. She made the cutest Snowman Hat candy holders Here are my renditions of the hat. I used the cardboard tubes from the pastry tubes here to make these. My tubes were 2.5 inches in diameter. I covered the bottom of the tube with a 2.75 inch circle of white card stock, folding the edges of the circle to adhere to the sides of the tube. Then I covered the tube with a strip of black card stock. Then I cut a 3.5 inch circle in black card stock and glued it to the covered bottom of the tube. I found that attaching the ribbon band is easier to do before attaching the bottom circle. Trust me there is a band of red and white polka dot ribbon around the hat. I then threaded a white snowflake brad through a red and white polka dot flower and added a loop of sheer green ribbon to represent leaves. I attached the flower to the hat band with a glue dot. I went around the brim of the tube with a black marker to hide the edge of the tube.


 This was a fast and easy project. I'm filling them with Andes Mints for treat cups to hand out at my son's office. Thanks so much for stopping by. If you have a moment, please leave a comment. I'd love to hear from you.


12/08/2010
Holiday Cookbook Day 5
Wow, I can tell I started way too many projects at the same time. Sorry for the delays in the cookbook pages.
Today we have Stuffing Bread. I make mine in a bread machine because I can no longer knead dough because of the arthritis in my hands. I rarely bake it in the bread machine, but I do all the steps up until the baking then I transfer the dough to my bread pan and bake in the oven. I usually don't use this to make stuffing, although it is very good for flavor. We like to make turkey sandwiches on this bread. It's like a second Thanksgiving meal.
 The sign post is from Pooh and Friends and is cut at 4". The bread is from From My Kitchen and is cut at 2". The font for the sign is from Calligraphy Collection and is cut at 1". The title font is from Plantin Schoolbook and is cut at 1". The paper is from an old K&Company stack. I thought the blue card stock I used on for the recipe brought out the blue in the background. Here are closeups of the pages:

 Thanks for stopping by. If you get a chance, please leave a comment. I cherish them all, but I know how busy everyone is this time a year. Take care.
Sue
Today we have Stuffing Bread. I make mine in a bread machine because I can no longer knead dough because of the arthritis in my hands. I rarely bake it in the bread machine, but I do all the steps up until the baking then I transfer the dough to my bread pan and bake in the oven. I usually don't use this to make stuffing, although it is very good for flavor. We like to make turkey sandwiches on this bread. It's like a second Thanksgiving meal.


Sue
12/07/2010
Christmas Card #11
Nothing like being out of order. Oh well, we're back to snowmen. I saw this great tutorial at Techniques by Trish I fell in love with this wobbly snowman. However, I don't have the motion spring, so mine is stationary. But he's still cute...LOL.
This was probably the fastest card I made so far.


 Thanks for stopping by.
Sue
This was probably the fastest card I made so far.


Sue
12/06/2010
Christmas Card #12
Its a card, its an ornament, its a house. LOL. I was making some ornaments from the Christmas Solutions cartridge. I thought this house would be cute on a card that will read "From Our House to Yours"...
I cut the card from green card stock 4.25 x 11 inches. I used two sheets of designer paper from the DCWV Christmas stack (last year's). One is craft colored and the other is red and tan striped, They are cut at 5.25 by 4 1/8 inches and 5 by 4 inches. I cut the house blackout in black at 4 inches. Then the house in tan card stock at 4 inches. The roof and snow were cut at 4 inches also. I glued the snow and roof to the house, then placed a piece of yellow card stock behind the house (for the window light) before I glued it to the black base. Then using a red marker I colored around the windows, door, and chimneys. I used a layer of glossy accents covered with white glitter for the snow. I punched a hole through all layers and tied a white ribbon to use as a hanger. The house is removable to use as a decoration if desired. The snowflake ribbon used for an accent on the front and inside of the card is from Hobby Lobby. I think I will include these in my food gift baskets this year.
Thanks for stopping by. Sue


12/05/2010
Christmas Card #10
One of my favorite things about Christmas is the carols. When I saw these rub ons at Michaels, I just knew I had to make a card with them. It's a basic A2 card cut out of white card stock, covered with a 4.25 by 5.5 inch rectangle of holly designer paper. I punched two strips of red and white dotted designer paper with a MS double edge punch (sorry I forgot the name of it). Then glued a red velvet ribbon (elasticized and has a sheer ruffle on each side) down one side of each strip. The rub on words came from Paper Wishes. My carolers are on the inside. Fa La La...LOL
Thanks for stopping by. Sue


Thanks for stopping by. Sue


12/04/2010
Birthday Card
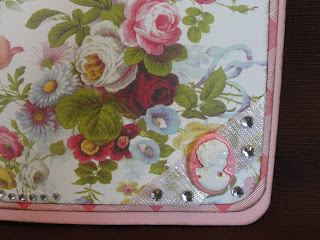
I made this card for my dear, sweet friend Mary over at CardzTV. She is so super sweet and a great artist. I wanted to make a feminine card that had nothing to do with the Holiday season. I put roses, gems, glittery sheer ribbon, a cameo, and a beautiful butterfly (my friend June sent me) to try and make it as special as Mary is. I hope she likes it. HAPPY BIRTHDAY MARY.
Sue


Sue


12/03/2010
A Note of Thanks
I used the blackout cut of the musical note from Gypsy Wandering as an accent on this thank you card. The card started with a 4.25 by 11 inch piece of white card stock folded to make a portrait A2 card. I covered the front with a 4 by 5.25 inch piece of purple designer paper after I inked the edges with a cocoa stamp pad. I took a piece of ivory card stock and ran it through the Cuttlebug folder Allegro. I used ink pads to to color the cream card stock all over - one lavender and two shades of pink were used. I then went back over the raised embossing with lavender to make it more predominate. I inked around it with the cocoa ink. I trimmed this piece to 4 by 3.75 inches and attached it to the upper center of the purple paper. The musical note was cut at 3.48 inches. I inked it with cocoa ink, tied a white ribbon to one of the note stems and added three gems then pop dotted it onto the top. I then add a gem to each corner. The wording was printed on the computer and tucked it under the bottom of the embossed layer.
Thanks for stopping by. Sue

Thanks for stopping by. Sue

12/02/2010
Christmas Card #9
This is another card made from the Smiley Cards Cartridge. It is using the star card which is found on the top row under the apple. I cut the star card at 5 inches in green for the base. I then cut a single 5 inch star in red for Santa's suit and hat, and one in black for his boots. I used the Santa from Doodlecharms (pg. 68) for the face. I cut one more star from designer paper that is covered with HO HO HO for the inside. I will print a sentiment out on white to put on that paper. This is a little flimsy since the card is only connected at the top point of the star, but I think all the layers of paper will help hold it together. I added some texture with white ricrac, White Lace and Platinum Stickles, and white Liquid Applique for the beard.
Thanks for stopping by. Sue


Thanks for stopping by. Sue


Christmas Card #8
Wow am I behind in posting. Sorry. I've been working on scout and school projects. Here's Christmas Card #8. Not a Santa this time...LOL. But a snowman. When I updated my Gypsy last week, I received the free cartridges including Smiley Cards. This is a card from that cartridge. I really cheated on this one because Mr. Snowman is actually a design on the DCWV Christmas Paper. I used the frame card on the Smiley Cards that's for the flower on the third row second image from the left next to the mushroom. I cut it at 11 by 4.25 inches as the frame card, then I hide the window and cut another as the support card. If you had thicker card stock and weren't using a sheet of designer paper as the window, you could probably skip the support card. The frame is quite large, so the card base seemed rather flimsy to me, so I add the support layer as the inside. I cut the square of designer paper at 4 by 5 inches and sandwiched it in between. Then added the bling. I really like these snowflake buttons. I purchased a bag of 100 different sized ones, and they are really nice accents. On these I used a gem, but I like to tie a floss bow in them also. The silver flower is from a Christmas pick.
Thanks for stopping by. Sue


Thanks for stopping by. Sue


11/29/2010
Some turkey suprises
I wanted to share a couple of turkeys we had at Thanksgiving. The first turkey was made by my grandson, Paul, at his Webelos meeting.

The other turkey my DIL purchased from a lady where she works. It was just beautiful and yummy! Here are a few pics.

 The turkey's body was a ball of the most delicious chocolate "hollow" thank goodness or we would have all been sick. The feathers, wings, head and breast were sugar cookies with either colored icing and sugar crystals or chocolate icing. Even the feet were cookies. My grand children loved the cookies on sticks. It was a fun decoration and nice dessert treat.
The nutcrackers on either side of the turkey are my granddaughter Beth's. She collections them and this year her mom found some that were for Thanksgiving.
Thanks for stopping by.
Sue

He made it with an Oreo, candy corn, and a few M&Ms.
The other turkey my DIL purchased from a lady where she works. It was just beautiful and yummy! Here are a few pics.


The nutcrackers on either side of the turkey are my granddaughter Beth's. She collections them and this year her mom found some that were for Thanksgiving.
Thanks for stopping by.
Sue
Christmas & Muppets at MSI
Happy Monday everyone. I hope you had a fantastic holiday weekend. On Saturday we headed into Chicago to visit the Museum of Science and Industry. The Christmas Around the World and Holidays of Light exhibit is now open which is a favorite in our house. To add to the excitement Jim Henson's Fantastic World was still open. No pictures were allowed in the Jim Hensen exhibit, but I have some of the White House Gingerbread exhibit that featured the Muppets this year.
MUPPETS IN MARZIPAN:


You can see pictures of the Jim Henson exhibit by following this link JH
MUPPETS IN MARZIPAN:


You can see pictures of the Jim Henson exhibit by following this link JH
You can learn about the Christmas Trees by following this link CAW
Thanks for stopping by.
Sue
Subscribe to:
Posts (Atom)