FOR CARDZ TV CHALLENGE #1 CLICK HERE.
"We're So Thankful"! is challenge #95 at Cricut Cardz Challenge. Make a Thanksgiving card using a card cut from any Cricut Cartridge.
Here's my entry:
The card cut is from Picturesque. The cartridge shows it as a tri-fold card, but I changed it to a bi-fold. It is cut at 4.25" high (making it 11.18" wide). This is my favorite cartridge for card cuts because they are all unique.
The greeting is cut from Lyrical Letters at 1.65" high making it 4" wide. I cut the pinecone twice splitting the second cut into the cone and the needles. I inked the needles green and the cone brown on that cut. Then layered both pieces onto the first cut before adding it to the phrase cut.
I wanted my little surprise to really stand out so I backed the windows with green glitter paper and recut only one window (by hand).
Here is the inside:
I just love this little pilgrim mouse. He is so sweet. The beautiful saying "Sending you miles of smiles" is from CardzTV Stamps. It is part of the Encouraging Thoughts set Mary created. I must say these are some of the best quality stamps I've ever used. They are really deep cut so they ink beautifully.
Supplies
Stamps: CardzTV Stamps "Encouragimg Thoughts"
Ink: Momento Rich Cocoa, Olive Green
Paper: Recollections white and craft, DCWV green glitter, Dana's Closet green (inside lining on top)
Bling: Recollections flower and gem
Cuts: Cricut Picturesque and Lyrical Letters
Image: MS Office
Thanks for stopping by. Be sure to check out all the other entries at Cricut Cardz Challenge.
Sue
A place to share my creations and inspirations with other card makers and scrapers.
11/20/2011
11/18/2011
Cardz TV Stamp Challenge #1
Today's an exciting day! Mary is having the first CardzTV Stamp Challenge here. We were asked to make a card "In Our Style". I'm featuring Mary's stamp set called "Classic Christmas" which is a beautiful set of wonderful sentiments in scripted letters and lots of swirls!
My style is:
More than anything about card making, I love to change smooth and flat paper into a card with texture and dimension. I usually try to stay in three colors and I like to add bling! So here's my entry, a Christmas easel card featuring a snowflake cut from When It's Cold Outside.
Stamps: CardzTV Stamps "Classic Christmas"
Ink: StazOn Black
Paper: Recollections White, Black
Embossing: Versamark Stamp Pad, Gold Ultra Fine Embossing Powder
Bling: Recollections ruby gems, HOTP Dazzles (Stacking Hearts)
Cricut Cartridge: When It's Cold Outside cut at 5.25" both main cut and shadow 3rd row 2nd image
Thanks for stopping by. Be sure to stop by the first CardzTV Stamp Challenge here to check out all the other projects. I promise you will be glad you did!
Sue
My style is:
More than anything about card making, I love to change smooth and flat paper into a card with texture and dimension. I usually try to stay in three colors and I like to add bling! So here's my entry, a Christmas easel card featuring a snowflake cut from When It's Cold Outside.
Here's the side view.
Products Used:Stamps: CardzTV Stamps "Classic Christmas"
Ink: StazOn Black
Paper: Recollections White, Black
Embossing: Versamark Stamp Pad, Gold Ultra Fine Embossing Powder
Bling: Recollections ruby gems, HOTP Dazzles (Stacking Hearts)
Cricut Cartridge: When It's Cold Outside cut at 5.25" both main cut and shadow 3rd row 2nd image
Thanks for stopping by. Be sure to stop by the first CardzTV Stamp Challenge here to check out all the other projects. I promise you will be glad you did!
Sue
11/14/2011
Christmas Tag Card
I watched this Paper Wishes Webisode on making a small mini from die cut labels. I didn't really want to make a mini, but decided to make a card using the same idea. I have a friend who loves the images of Christmas so much she displays them throughout her house all year long. I thought she would get a kick out of this card. It is so easy to make. I still have to cover the front of the card, and now that my stamps have arrived I can get to that part. But in the meantime I wanted to share the inside.
You start with 6 1/8" by 12" piece of card, I used Recollections White Card. You score along the 12" side at 4" and 8". Between the 4 and 8 inch score lines you score every 1/2 inch.
These 1/2" scores are folded mountain/valley then are glued to form four tabs. These tabs become the spines for the pages.
I didn't add too many layers to the pages, so the card would be flat. Most of the elements were stickers and rub ons I had in my stash from last Christmas sales. I only inked all over the first page. I thought I would like it, but it seemed a bit over powering when I got done. Much of the bling is from Dazzles gems since they are flat but the holographic images are beautiful.
So here are the pages I made:
Page 1.
Pages 2 and 3
Pages 4 and 5
Pages 6 and 7
Page 8
Thanks for stopping by. Leave a comment if you have the time.
Sue
11/09/2011
Thanksgiving Goodie Bag
I made this "treat" bag for a friend who is very special to my heart. She has given me much encouragement and kindness so I wanted to repay some of her kindness with a small bag of goodies. The "Happy Thanksgiving" stamp was offered by Cindy at her Scraptastic Monday Challenge this week. I used it to label this bag made of craft card and DCWV Stack 7 papers. I made the flowers (see this post) before. This time I added brown ink to bring them into the fall coloring and added two leaves cut from Cuttlebug fall leaves dies. The bag measures 4" wide by 5" tall by 1" deep. I threaded twine through two side eyelets for the handles. Thanks for Janis' encouragement to enter this at
http://joyfulstamper.blogspot.com/
Thanks for stopping by.
Sue
http://joyfulstamper.blogspot.com/Thanks for stopping by.
Sue
11/08/2011
Card-In-Waiting 2
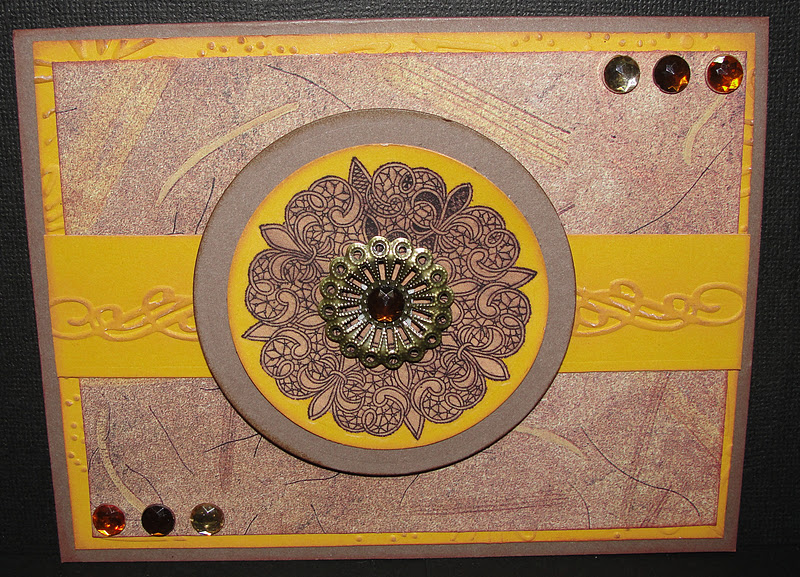
Another "card-in-waiting" today. I seem to always need a card for a guy, but never enough time to come up with ideas. This card was an offshoot of my efforts to organize my Cuttlebug folders. I was making examples of each folder for a binder and I thought combine these two folders Sue. So I did.
It's a very simple card to make.
I used only two colors of card stock (craft and a yellow from Color Bok). Standard mat sizes: the yellow background (4" x 5.25") I ran through the Cuttlebug folder "Snowflakes" then inked with Ranger vintage photo ink. The patterned paper (3.75" x 5") is a scrap from my stash. The yellow center strip (1"x 5.25") is embossed with the Cuttlebug border set "With Love", and inked the same way as the background paper. HINT: emboss the image first then cut the strip. The circles (2.5" and 2") were cut using the Cricut with the George cart and inked. Now the fun part. The image is a rub-on from a set of vintage images sold at Michaels (they were by the unfinished wood shapes). I used a large metal medallion brad with a jewel center and small gems to finish off the card.
There are no sentiments on the card yet. I'm creating a stash of cards for "emergency" situations when I don't have time to create a needed card. This is going in the masculine section of the stash.
Thanks for stopping by.
Sue
11/07/2011
Very Special Day for me
What started out as a dreary Monday has now turned into the most fantastic day! Mary at CardzTV has honored me by choosing me as a member of the first Cardz TV Design Team! Thank you so very much Mary. What a tremendous group of very talented artists I'm blessed to join. Wow, what a day.
Sue
11/05/2011
Embossed "Christmas Card in waiting"
I wanted to make up some Christmas cards that were about 75% complete so I could add elements to personalize them when the need arises. This is the first one I tried. The jingle bells are cut from the Cricut cartridge Christmas Solutions at 2 inches. I used all three layers of the image cutting the top two layers out of white card stock and the blackout layer from ivory pearlized paper (DCWV School Solids pack). I inked the middle layer with Aged Photo Ink by Ranger. I ran the top layer through my Zyron machine then applied and heat set gold embossing powder. When I assembled the bells, I trimmed the blackout layer slightly at the bottom of each bell. The twine that holds the bells together is DMC memory thread (olive). The red satin and red sparkle velvet ribbons are from Hobby Lobby.
The green background paper is plain green card stock (from my stash) ran through the Cuttlebug snowflake folder. I slightly inked the edges with warm brown then misted them with Tsukineko's Sheer Shimmer Sparkle mist. Now I have a special card ready for an unexpected need. I just need to pop on a sentiment (which I make several of the basics to keep on hand) and hand write a greeting on the inside.
Thanks for stopping by.
Sue
Subscribe to:
Posts (Atom)