Welcome to Sue's Crafty Mess and my mini for the So Many Mini Albums Blog Hop. If you came here after seeing the great project on Gale's blog, then you're on the right path and closing in on the end of the hop. If not, I encourage you to start at the beginning so you don't miss any of the wonderful projects or prizes. Here is the list in order.
Mary http://www.cardztv.blogspot.
Drew http://www.scrappyhappiness.
Corri http://www.buglvr.blogspot.com
Janis http://www.pausedreamenjoy.
Raven http://www.love4stamps.
Nicole http://www.primpedinpaper.com
Jenni http://www.
Ruthie http://www.septemberninth.
Michelle http://www.mumoftwoblog.
Gale http://www.thehappystamper.com/
Sue You are here now.
Roxy http://roxpaperscissors.
I decided to make a Mini Album that didn't involve using a Cricut, Bind-It-All, or any other electronic devise. All you need is paper, scissors, adhesive and a paper trimmer. My favorite Christmas memory is watching White Christmas with my Mom. It was her favorite Christmas show and her favorite song. So I made a mini album on wishing for snow on Christmas.
Let go:
These are the supplies:
3 sheets of 12" by 12" card stock paper in solid colors. I chose this glimmer paper and used 2 blue and 1 ivory sheet. This will give you enough for two mini albums.

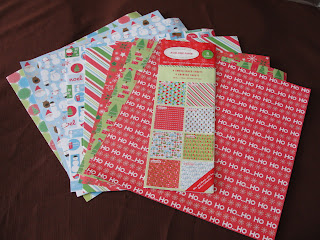
3 sheets of 12" by 12" designer papers. I used 3 sheets from this package I bought at Target. This will also give you enough for two mini albums.
Optoinal: six 3" by 3" note cards and their matching envelopes. I used this set from DCWV. I bought them at Michaels. These become the mats for the mini album. The envelopes become the pockets.
 If you don't used the note cards, you can make your own by folding a 6" by 3" piece of card stock to make the 3" by 3" cards. There is pattern for the envelope here.
MAKING THE MINI ALBUM PAGES
Step one:
Cut each sheet of card stock in half so you have 6" by 12" pieces. You will only need 3 for the mini album.

Do the same for the designer paper. NOTE: make sure the design runs the correct way on the piece of paper - the 12" side will be the top and bottom of the mini album.

Step 2:
Adhere the designer paper to the back of the card stock. I used score tape to make sure the pieces held together.
 Step 3:
First and foremost: Thanks Mary for asking me to be part of this blog hop.
I decided to make a Mini Album that didn't involve using a Cricut, Bind-It-All, or any other electronic devise. All you need is paper, scissors, adhesive and a paper trimmer. My favorite Christmas memory is watching White Christmas with my Mom. It was her favorite Christmas show and her favorite song. So I made a mini album on wishing for snow on Christmas.
Let go:
These are the supplies:
3 sheets of 12" by 12" card stock paper in solid colors. I chose this glimmer paper and used 2 blue and 1 ivory sheet. This will give you enough for two mini albums.

3 sheets of 12" by 12" designer papers. I used 3 sheets from this package I bought at Target. This will also give you enough for two mini albums.

Optoinal: six 3" by 3" note cards and their matching envelopes. I used this set from DCWV. I bought them at Michaels. These become the mats for the mini album. The envelopes become the pockets.

MAKING THE MINI ALBUM PAGES
Step one:
Cut each sheet of card stock in half so you have 6" by 12" pieces. You will only need 3 for the mini album.

Do the same for the designer paper. NOTE: make sure the design runs the correct way on the piece of paper - the 12" side will be the top and bottom of the mini album.

Step 2:
Adhere the designer paper to the back of the card stock. I used score tape to make sure the pieces held together.

Score each of the three double sheets in at 6" along the 12" side. Crease the fold both to the inside and the outside.


Step 4:
Fold all three pieces so the card stock is on the outside. Make sure the designer paper is facing the right direction on the inside. Place a ruler against the folded edge. Draw a small pencil mark at the center (3") and 1/2" in from the top and bottom on the folded edge. You will cut the binding slits at these marks.
Using scissors cut a small semi circle at the 1/2" marks. MAKE SURE IT IS SMALL. WHEN YOU OPEN THE CARD IT SHOULD BE ABOUT 1/4" IN DIAMETER. On either side of the 3" mark cut a slit 1/2" long and 1/8" wide. See illustrations below.


The slits on all three pieces should line up when cut.

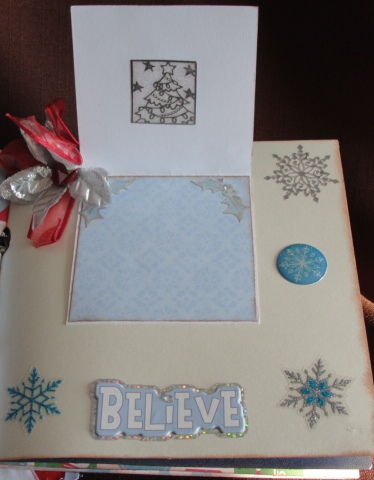
If desired, ink around all the edges of the pieces including both sides of the fold on each piece. You now have three sheets that form the front and back cover (card stock side) and 8 pages that alternate between designer paper and card stock, and the center two pages which are designer paper.
I decorate my mini album before I bind it. It's easier to put the elements on while the page is flat.
So, go decorate your pages however you want them. I used the small envelopes as pockets. I sealed the envelope then cut off a small strip. In this picture I cut the strip off the edge that I sealed. I found while doing the project it was better to cut if off the opposite end.

BINDING THE MINI ALBUM
Now that the pages are done, place them in the correct order. With the cover face down on the surface and the center designer page facing upward. Turn the mini so the 6" side is closest to you. You will need 14" of twine (I used colored jute that came from the jewelry making section of Michaels.) Line up all the holes.

Step 1:
Start by threading the twine from the right side into the small hole (at the 1/2" mark) on the right side. Pull the twine through all three pieces of the mini so it comes out at the cover.


From the front cover, thread the twine through the next hole (between the 1/2" mark and the 3" mark). Pull the twine all the way through to the center.


Step 3:
Loop the right hand piece of twine around the top of the album and thread it from the front cover to the center page. Straighten the loop and pull tight. Repeat on the bottom with the left hand piece of twine.

Step 4:
Now thread the right hand piece of twine through the hole to the left of the hole you just came through. Repeat with the left hand piece. Both pieces of twine should be on the front cover now.

Pull the twine tightly. Check all the loops to make sure they are straight on the cover and the center page. Tie the twine in a double knot on the cover side.


Your mini album is now bound. Both the outside and the inside should look like this:


I don't trim the twine ends until I finish adding ribbons. If you choose not to add ribbons, you can either tie the twine into a bow, or just trim the ends close to the double knot.
Gather a pile of ribbons. I cut mine 10" long. Start tying them to the twine all along the fold of the album. Make sure to thread ribbons through all the sections of twine including the top and bottom small sections. I tie mine in double knots.


HERE IS THE FINISHED MINI ALBUM


The small cards can open to use as photo mats or for journaling. There are six of them in this mini album. The envelopes hold tags that also can be used for photos or journaling. There are eight tags in this mini album.
I hope you like my project for this blog hop. It was fun to design and complete. If you have any questions please let me know. I understand it is easier to learn from a video, but I don't have the equipment. I hope the pictures help.
HOW TO BE A WINNER
As my prize, I am giving this mini album away. To win, please leave a comment on this post. I will use Random Dot Org to select a winner from the comments posted. The winner will be posted on Monday, November 15, 2010 at 7:00 pm est. Please check back to see if you win. Good luck to all who enter.
Now, pop on over to Roxy's blog to see her fantastic mini. Thanks for stopping by.
Sue.